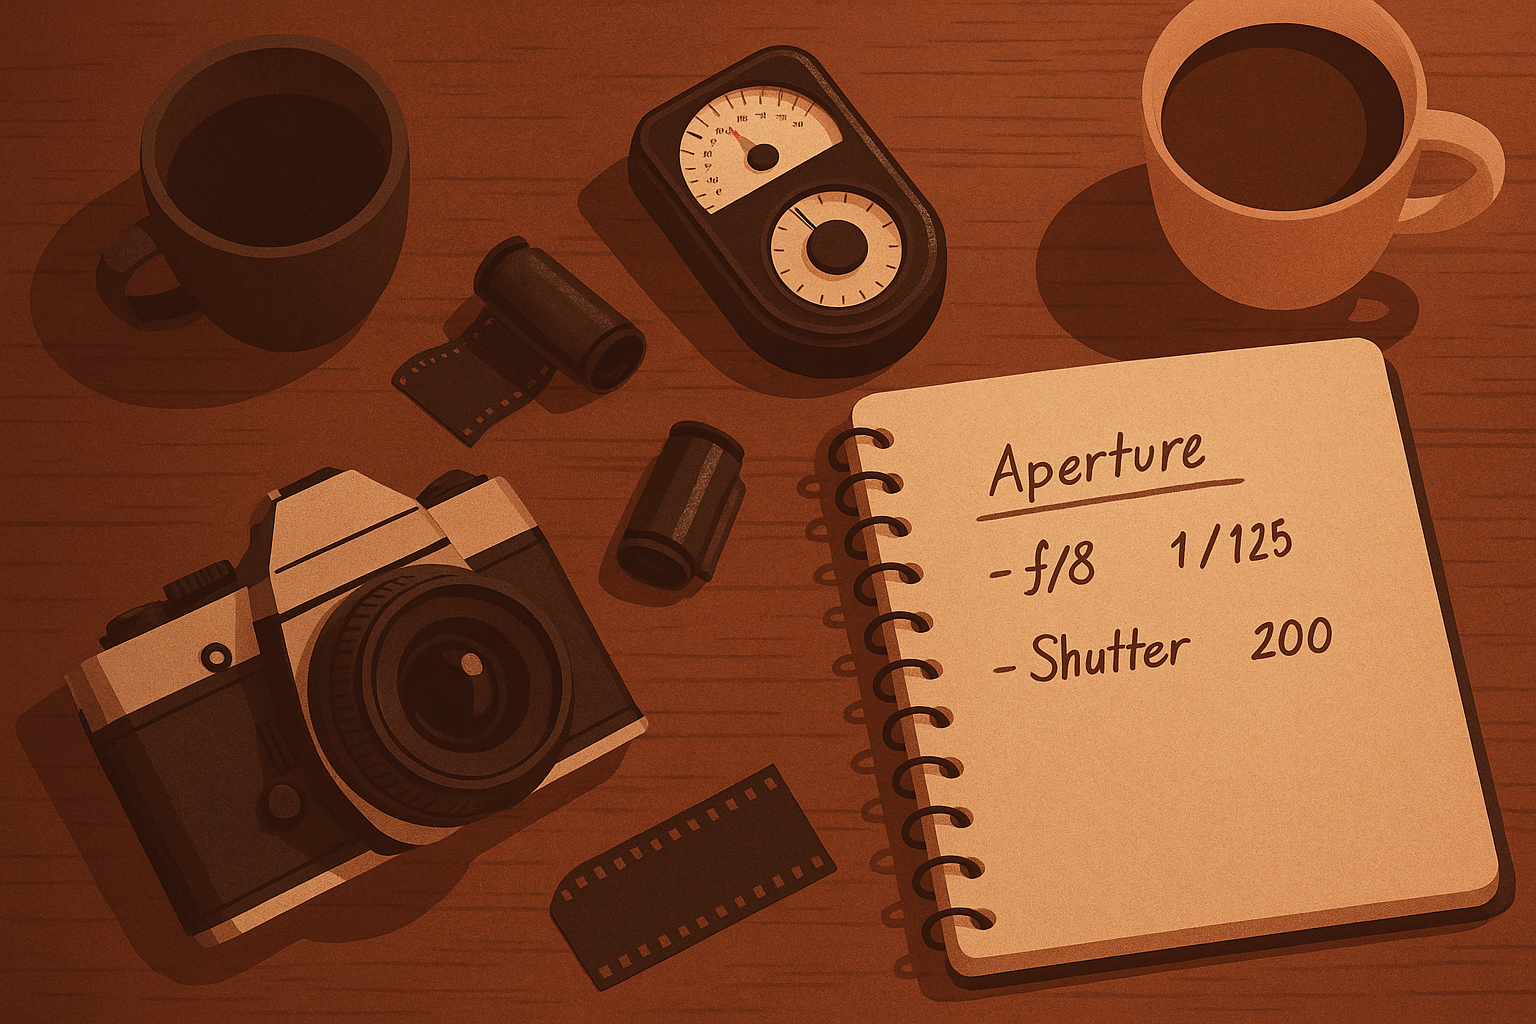
Stops, Push, Pull: Making Sense of Exposure Without Losing Your Mind
If there’s one topic that made me feel like I’d accidentally enrolled in night school, it’s film photography exposure. People toss around terms like stops, push, pull, latitude, bracketing and I’m standing there with my camera like: “Can someone just tell me which dial to turn… and why?”
This post is me slowing down and writing the guide I wish I’d had: plain-English exposure basics for film, with enough substance that it finally clicks.
What Is Film Photography Exposure?
At its core, exposure is the interaction between light and your film. When you press the shutter, light passes through the lens and lands on a thin layer of light-sensitive chemicals.
-
In black & white negative film, those chemicals are silver halide crystals. The more light they receive, the more of them are “activated.” During development, those areas turn darker.
-
In color negative film, multiple layers of dye-couplers are stacked, each sensitive to a different part of the spectrum (red, green, blue). Light activates each layer in proportion, and together they form the color information in your negative.
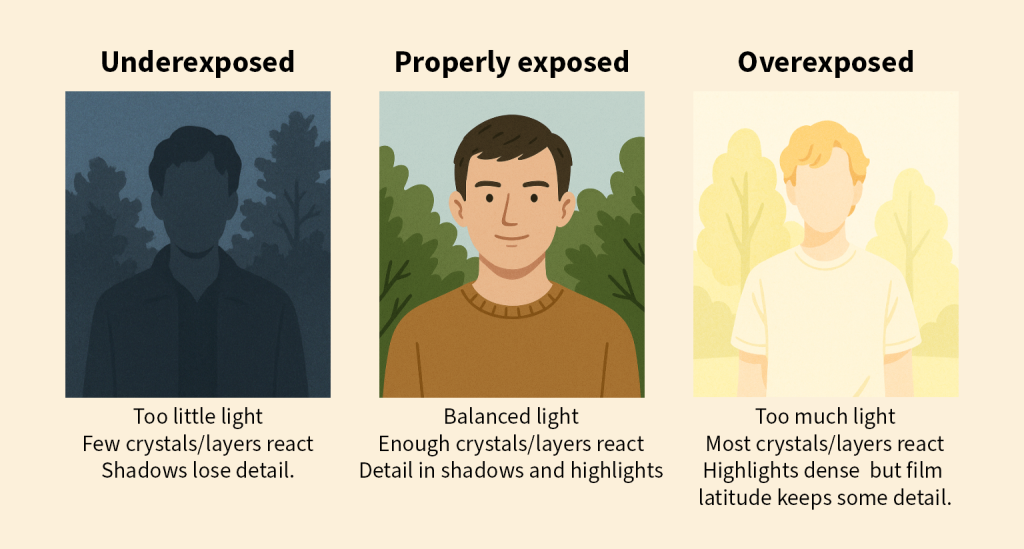
This chemical reaction is why exposure matters so much: too little light and not enough crystals or dyes react, leaving your shadows empty; too much light and nearly everything reacts, pushing highlights toward maximum density. The way film handles these extremes is where two key concepts come in: dynamic range and exposure latitude.
-
Dynamic Range is the total span of light a medium can capture — from the darkest shadow with detail to the brightest highlight with detail. Digital sensors usually boast wide dynamic range, but once highlights are clipped, the data is gone.
-
Exposure Latitude is about forgiveness. It describes how much you can over- or underexpose and still end up with usable results. Negative film has generous highlight latitude: you can overexpose by 2–3 stops and still keep detail. But underexpose, and the shadows disappear quickly because there was never enough light to activate the crystals in the first place.
That’s why the classic advice for negative film is to expose fot the shadows and develop for the highlights. Give your shadows enough light to record and let the film’s highlight latitude take care of the rest.
Basically, all this means is that:
-
Underexposure: Too little light. Not enough crystals or dyes react. Shadows lose detail because there’s simply nothing recorded in the darkest areas.
-
Overexposure: Too much light. Almost all crystals or dyes react. On digital, this usually means “blown out” highlights — data gone forever. On film, especially color negative and B&W, there’s more tolerance. Highlights often still hold detail because film has what’s called exposure latitude.
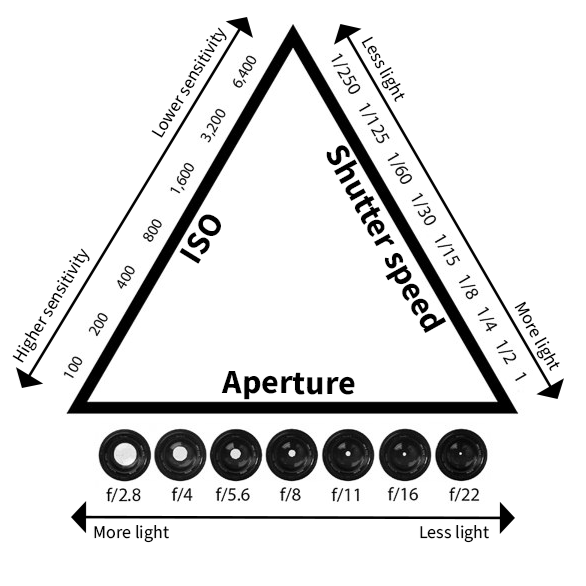
The Exposure Triangle (a.k.a. the Three Knobs of Film Photography Exposure)
Exposure isn’t controlled by just one dial, it’s a balance of three. Together, aperture, shutter speed, and ISO make up the famous exposure triangle. Each setting changes how much light your film receives, but each also leaves a creative fingerprint on your photo. That’s why exposure isn’t just about “correct brightness” — it’s about deciding what kind of image you want.
Aperture (the lens opening)
Inside every lens is a diaphragm — a circle of blades that opens and closes like the iris in your eye. The size of this opening is measured in f-numbers (f/2.8, f/4, f/5.6, f/8, etc.).
-
Light: A wider opening (say f/2.8) lets in more light, while a narrower one (say f/11) lets in less.
-
Look: Aperture also controls depth of field, or how much of the scene is in focus.
-
At f/2.8, only a thin slice is sharp — great for dreamy portraits with blurry backgrounds.
-
At f/11, much more of the frame is sharp — ideal for landscapes where you want detail front to back.
-
Think of aperture as your control over both brightness and focus feel.
Shutter Speed (the time window)
The shutter is like a curtain in front of your film. Press the button and it opens for a split second, letting light hit the emulsion, then closes again. Shutter speed is how long that window stays open: 1/1000s, 1/250s, 1/30s, all the way down to several seconds.
-
Light: A longer exposure (like 1/30s) allows more light onto the film. A faster one (like 1/1000s) lets in very little.
-
Look: Shutter speed decides how motion is rendered.
-
At 1/1000s, you can freeze a cyclist mid-pedal.
-
At 1/30s, moving subjects blur — and if your hands shake, so does the whole photo.
-
Think of shutter speed as your control over both brightness and motion feel.
ISO / Film Speed (the baked-in sensitivity)
ISO is the number printed on your film box: 100, 200, 400, 800, etc. Unlike digital, where you can dial ISO up and down on every shot, with film your sensitivity is fixed for the whole roll. ISO tells you how reactive the film is to light.
-
Light: A lower ISO (100) needs more light — so you’ll need a wider aperture or longer shutter speed. A higher ISO (800) needs less light, making it better for indoors or evening.
-
Look: ISO also changes the film’s grain and tonality.
-
ISO 100 film is usually smooth and fine-grained, great for detail.
-
ISO 800+ film is grainier, with punchier contrast — sometimes gritty, sometimes beautiful, depending on what you want.
-
And here’s the important bit: film doesn’t like being underexposed. With black & white and color negative film, it’s often safer to overexposure a bit. Give it a little extra light and you’ll usually keep smooth tones and usable detail. Shadows recover poorly if you starve them of light, but highlights often survive an extra stop or two.
So when you’re loading a roll of black & white or color negative film, a good rule of thumb is to rate it a stop slower than box speed. For example, shoot ISO 400 as if it were ISO 200. You’ll overexpose slightly, and negative film will thank you.
Putting It All Together
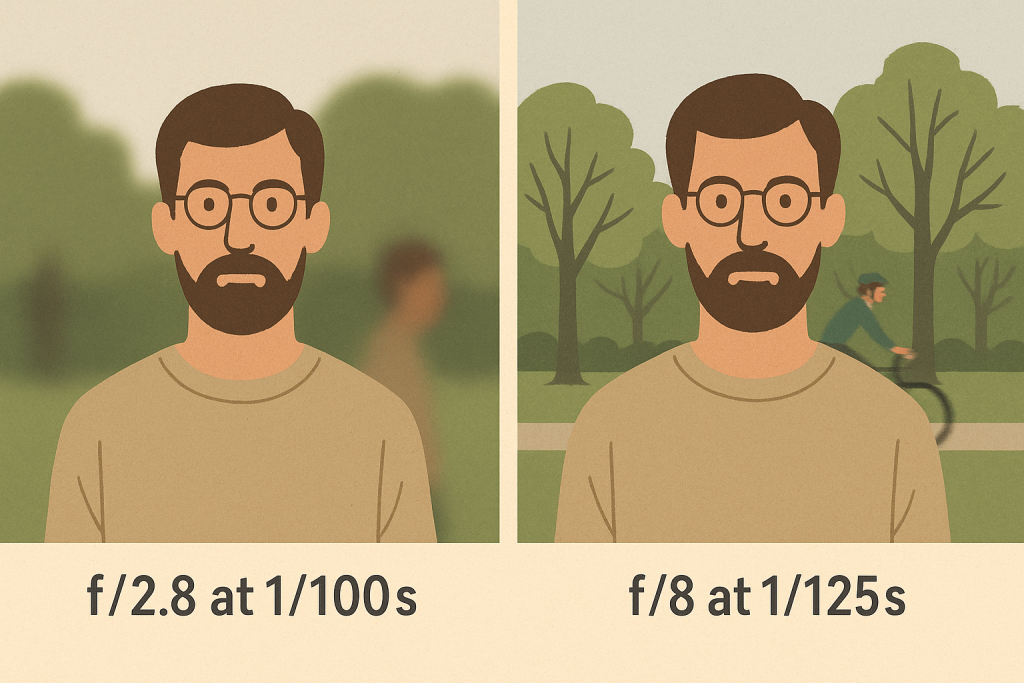
So that’s a lot of technical stuff, but how do I puth this together in real life? The trick is that you can adjust one setting if you compensate with another, and still keep the overall brightness of the photo the same.
Imagine your light meter tells you f/8 at 1/125s on ISO 400 film. That’s your baseline.. But you have options:
-
Want a blurrier background? Open the aperture to f/5.6. That lets in more light — so to keep things balanced, you’ll need a faster shutter speed like 1/250s.
-
Want to freeze motion? Increase the shutter speed to 1/500s. That means the film is exposed for a shorter time and less light gets in, so you’ll need to open the aperture wider, to around f/4.
-
Want everything sharp in a landscape? Close the aperture down to f/11. Now less light comes through, so you’ll need a slower shutter speed like 1/60s to let in enough.
In each case, the overall exposure — how much light hits the film — stays about the same. What changes is the look of the photo: how much is in focus, whether motion is frozen or blurred, and how much grain or smoothness you get depending on your film speed.
That’s the beauty of the exposure and the exposure triangle: it’s not just about correct brightness, it’s about making creative choices.
Commonly Used Jargon (a.k.a. The Words That Used to Confuse Me)
Film photography has its own little dictionary. Here are the ones you’ll keep running into — explained without the cryptic tone.
Stop
A stop is just a way of saying “double or halve the light.”
-
Aperture: f/8 → f/5.6 lets in twice as much light (one stop more). f/8 → f/11 lets in half as much (one stop less).
-
Shutter speed: 1/125s → 1/60s = one stop more light (slower shutter = longer exposure). 1/125s → 1/250s = one stop less (faster shutter = shorter exposure).
-
ISO/film speed: ISO 200 → ISO 400 is one stop more sensitive (film needs half the light). ISO 400 → ISO 200 is one stop less sensitive.
So “one stop” is like the universal currency of exposure.
Overexposure & Underexposure
-
Overexposure: Film got too much On digital, highlights are gone forever, but negative film (color and B&W) usually still has detail in the highlights. Often looks bright, smooth, and forgiving.
-
Underexposure: Film got too little Shadows lose detail quickly and often look muddy or blocked.
Push Processing
Shooting film at a higher ISO than the box says, then developing it longer to compensate.
-
Why? To shoot in lower light or to force faster shutter speeds.
-
Look: More contrast, more grain, often a punchier feel.
Pull Processing
The opposite: rating film at a lower ISO and developing it for less time.
-
Why? To soften contrast and get smoother tones.
-
Look: Flatter, softer, sometimes dreamier, but highlights can blow out more easily.
Box Speed
The ISO printed on the film box — the official sensitivity rating from the manufacturer. Many photographers shoot at box speed, but others deliberately overrate or underrate the film (and adjust development) to get the look they want.
Latitude
How forgiving a film is when you miss exposure. Negative film has wide latitude in the highlights (it can take extra light without losing detail). Slide film has almost none — it demands accuracy.
Dynamic Range
How much detail a medium can hold between its darkest shadows and brightest highlights. Related to latitude, but more about the absolute limits than the forgiveness.
Common Beginner Mistakes (that I still make … a lot)
Even if you’ve read about exposure until your brain feels like overdeveloped film, it’s the actual shooting that teaches you where things go wrong. Here are a few traps I’ve personally fallen into — and how to avoid them.
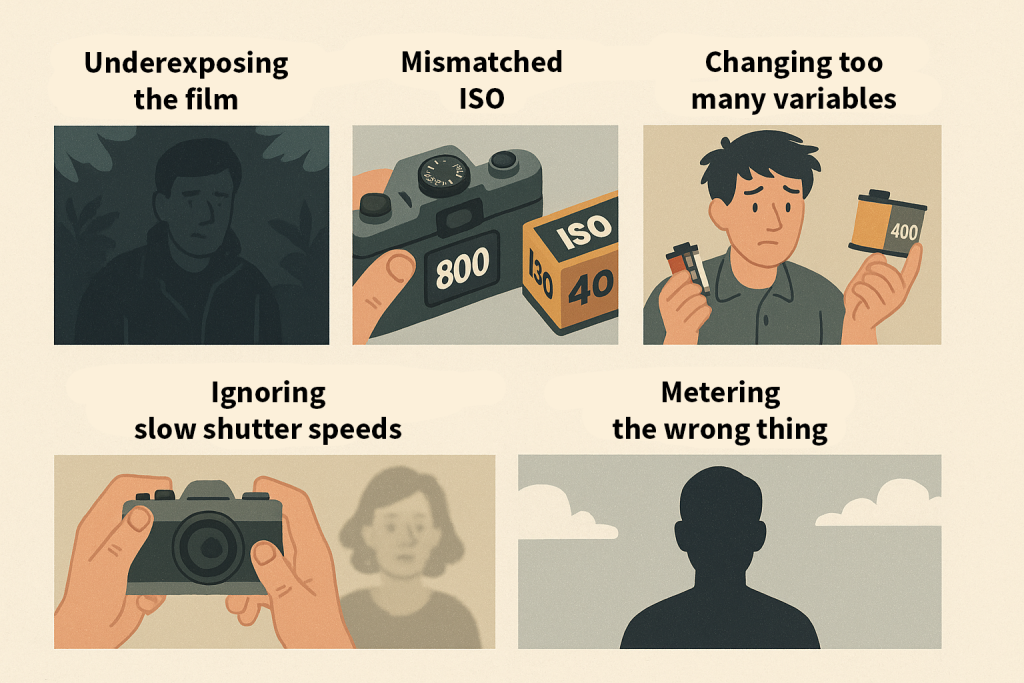
1. Underexposing negative film
Film — especially black & white and color negative — loves light. If you give it a little extra, you usually get smoother tones and usable detail. Starve it, and the shadows collapse into muddy darkness. Once detail is gone in the shadows, no scanner or darkroom trick will bring it back.
Fix: When in doubt, lean toward slight overexposure. Adding even one stop of extra light is usually safer. Your highlights will forgive you, your shadows won’t.
2. Mismatched ISO
This one is humbling. You load a roll of ISO 400, but your camera is set to ISO 800. Congratulations — you’ve underexposed the entire roll without realizing it. I’ve done it, and the disappointment when the scans come back is real.
Fix: Always check that the ISO dial matches the box speed before you start shooting. And if you only notice afterward? Don’t panic. Film can often be rescued in development: extend the time to push underexposed shots, or shorten it to pull frames that were too bright.
3. Changing too many variables at once
I once shot a roll in a new camera, tried a new film stock, and decided to push it a stop. The result? I had no idea what went wrong — the camera, the film, or my processing. That’s the danger of mixing experiments. (LINK TO BLOG)
Fix: Stick to one factor at a time. Want to test how a film looks when overexposed? Keep everything else constant. Curious about pulling in development? Expose consistently so you can see the effect. Simplicity makes the results clear.
4. Ignoring minimum shutter speed for hand-holding
There’s nothing worse than thinking you nailed a shot, only to find the whole frame is blurry because your hands shook. A common guideline: don’t shoot slower than the length of your lens. With a 50mm lens, try to stay at 1/60s or faster. With a 28mm, you might get away with 1/30s.
Fix: If you drop below those speeds and sharpness matters, treat it as tripod territory. No tripod? Rest the camera on something solid and use the self-timer so your finger doesn’t blur the shot.
5. Metering the wrong thing
Here’s a classic: you meter the bright sky instead of your subject, and your subject turns into a silhouette. Or you meter a dark coat and the camera tries to brighten everything, blowing out the background.
Fix: Meter for what matters. If you don’t have a spot meter, use the “palm trick”: hold out your hand in the same light as your subject and meter that. Then adjust slightly depending on your skin tone:
-
Very light skin → give a little more light than the meter suggests.
-
Medium skin → the meter reading is usually accurate.
-
Darker skin → give a little less light than the meter suggests.
It’s not perfect, but it’s surprisingly reliable — and far better than letting your meter get fooled by a bright sky or dark background.
Closing Thoughts About Film Photography Exposure
I used to treat exposure like a riddle only “real” photographers could solve. But it’s just three knobs and a bit of cause-and-effect. The secret isn’t memorizing every combo — it’s shooting on purpose, changing one thing at a time, and looking at your results.
Give your film a touch of extra light. Don’t change five things at once. And if your camera’s meter is dead, Sunny 16 is a perfectly fine wingman (blog coming soon).
Check out my instagram page for more of my photo’s (LINK HERE)